Subaccounts
The basics
If you send emails on behalf of different clients or if you run multi-tenant systems to separate sending for different users, you can use subaccounts to manage reputation, activity, reports, and quotas across different senders under a single Mailchimp Transactional account.
This documentation will give you all the information you need to create and manage subaccounts, but to walk through the process with code samples, check out the Manage Different Users with Subaccounts guide.
Note: If you’re looking for a way to segment your messages without creating separate subaccounts, you can use tags or other metadata to manage sending.
Create a subaccount
You can create a subaccount with the web app or via the Transactional API.
In the app:
Navigate to the Outbound section and select Subaccounts
Click + Create a Subaccount
Choose a unique identifier for the subaccount, like a unique ID from your own application or database. You cannot change the identifier once the subaccount has been created.
Click Create Subaccount
Via the API, use the Subaccounts endpoint. (For sample code, see the subaccounts guide.)
Once your subaccount is up and running, you can use the subaccount parameter of the /messages/send endpoint, or you can use the X-MC-Subaccount header if you’re sending via SMTP.
Note: Make sure you enter the subaccount name correctly. If you try to send an email via the API from a subaccount that doesn’t exist, it will fail with an error. However, if you try to send from a nonexistent subaccount via SMTP, the email will be accepted by the SMTP server but will ultimately fail to send.
View subaccount activity
Mailchimp automatically tracks subaccount activity. The easiest way to view it is directly in your account, and there are two ways to do so.
To see a high-level overview, navigate to Outbound Activity, click the Show All Options toggle in the search panel, and choose your subaccount from the Subaccounts dropdown.
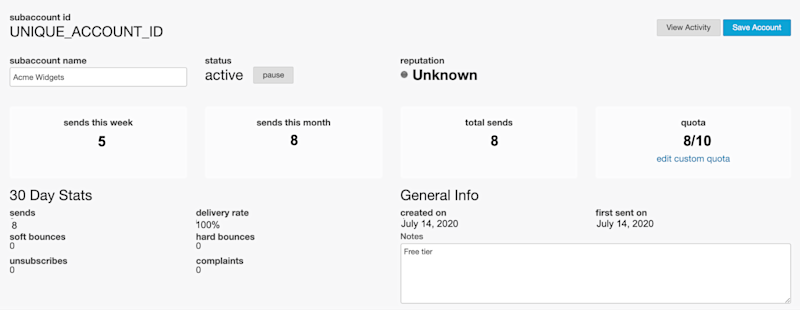
If you’d rather get a lower-level overview—where you can also change account status, add notes, and see stats that aren’t available on the Outbound Activity view—navigate to Subaccounts and click on the subaccount ID or the View Details button.

If you need programmatic access to account activity, you can use the subaccounts/info endpoint in the Transactional API. For sample code, see the Manage Different Users with Subaccounts guide.
Custom hourly quotas
By default, subaccounts have their own hourly quota that works just like the main account, but you can also create a custom fixed hourly quota for individual subaccounts. For sample code to create or update a custom quota, see the subaccounts guide.
To manage custom quotas in the app:
Navigate to Subaccounts and select View Details next to the subaccount you’d like to edit
Click set custom quota
Enter or modify the quota value (must be greater than 0) and click Set Quota
To remove a custom quota, navigate to the subaccount’s details and select edit custom quota. Then select Switch to Automated Quota, which will restore the subaccount to the default reputation formula.
Note: Two hourly quotas are considered for each subaccount: the primary account’s quota and the subaccount’s quota. The quota for a subaccount can’t be set to a value that’s higher than the primary account’s hourly quota.
However, if a subaccount sends a message that would put either the subaccount or the primary account over its hourly quota, the emails will be placed in the primary account’s backlog; subaccounts do not have separate backlogs.
While exceeding a subaccount’s quota will place its new emails in the backlog, email from subaccounts that have not exceeded their quota will still send unless the primary account's quota has been exceeded.
Subaccount rejections
If a message sent from a subaccount bounces, or if the recipient unsubscribes or reports a message as spam, their address will automatically be moved to that subaccount’s Rejection Denylist. This will only affect that subaccount; other subaccounts will still be able to send to that recipient without issue.
To view the Rejection Denylist for a specific subaccount, navigate to Rejection Lists and select the subaccount ID from the View Denylist For Subaccount drop-down menu.
You can also retrieve the Rejection Denylist for a subaccount via the Transactional API.
Pause and resume sending
You can temporarily stop sending for any subaccount using the app or the Transactional API. While sending is paused, emails will be queued into the account’s backlog.
To pause sending for a subaccount, navigate to the Subaccounts page, choose View Details on the specific subaccount, and click Pause. To resume sending, click Resume.
To walk through the code for pausing and resuming, see the subaccounts guide.
Delete a subaccount
Deleting a subaccount is permanent, and Mailchimp cannot recover a subaccount after it is deleted. This will not remove email activity associated with the subaccount, but you can no longer search activity by the subaccount name.
To delete a subaccount via the app, navigate to the Subaccounts page and click the Delete button next to the subaccount you want to remove. With the API, you can use the subaccounts/delete endpoint.