Change Sending Behavior with the Rules Engine
At a glance
Rules are a flexible way to change sending behavior based on searchable criteria in your Mailchimp Transactional account. The rules engine lets you take specific actions when events or messages meet criteria you’ve set.
Rules follow traditional if/then and any/all conditional logic:
if any email matches this then do that
For example, you might set rules like:
if any email is sent from notifications@example.com then add the “notifications” tag
if the subject line contains the term “announcement” then apply the “announcements” template
if any email is sent from receipts@example.com then do not track opens or clicks
In this guide, we’ll break down how rules work, explain how to set them up, and give some sample use cases to help you use the rules engine effectively.
What you’ll need
A Mailchimp Transactional account
How rules work
Every rule starts with the basic logic:
if any email matches this then do that
But in the rules engine, there are actually three components to every rule: the trigger, the condition, and the action. For example:
if an email is sent with a subject line that includes the term “event,” then apply the custom events template
The trigger: sending an email. The condition: the subject line must have the word “event” in it. The action: apply the events template.
Rules can have multiple criteria, and those criteria can contain wildcard pattern matches. Mailchimp Transactional supports the fnmatch format for wildcard pattern matching.
For example, if you want to create a new rule that looks for emails containing “QA” anywhere in the subject line, your rule condition would look like this:
subject line matches *QA*
But if you want to create a new rule that looks for any emails containing “[QA]” in the subject line, in brackets, you’d need to escape the brackets. Your rule condition would look like this:
subject line matches *\[QA\]*
Note: For a full list of rule triggers, conditions, and actions—as well as information about ordering and nesting—see the rules engine docs.
Create a rule
To create a new rule in your Mailchimp Transactional account:
Navigate to Rules
Click Add Rule
Add a descriptive name for your rule
Set the trigger for your rule and set your if/then condition(s)
Click Submit
Before you save your new rule, you’ll see the approximate number of emails you sent in the past seven days that match the rule’s criteria, but the rule won’t affect messages you’ve already sent.
Note: If you’ve set up a rule that uses pure wildcards (“*”), leading wildcards (e.g., “*the”), or null values, the number of matched emails Mailchimp Transactional can detect in the past week may be skewed.
Example rules
To help you get started, here are some scenarios where you might use rules:
Automatically include an unsubscribe footer
You’ve added an automatic unsubscribe footer via Sending Defaults, but you don’t want to include it on every email. Use a rule to add the unsubscribe footer only to emails tagged marketing:

Note: Most trigger types can only be used to send an event to a webhook (see the webhooks section below). The one exception is the “is sent” trigger, which we’re using in all of the examples below to demonstrate the range of possibilities.
Add tags to emails
You can use rules to add tags, which can help you customize your sends. Here, you’re adding the tag account-verification to all emails from the sender verify@domain.com:

Apply templates conditionally
If you’ve built templates for specific kinds of emails, you might want to apply those templates based on keywords in the subject line. Here, a rule is triggered whenever “verification” appears in a subject line, placing the message content into an editable template block called main:

Reject emails with an empty subject line
Rule conditions also support null values. Here, as a quality control measure, you want to reject emails with empty subject lines. To do so, you can just leave the subject line matches text field completely blank:

Exclude a domain
You can manually exclude individual email addresses, but you can’t do so with an entire domain. For that, you’ll need to set up a rule:

Integrate with webhooks
Webhooks allow you to receive data on your application server when certain email events are triggered—for example, when someone opens an email. If you want more fine-grained control over when your webhook receives events, you can use rules.
Say you create a webhook that runs every time a message is sent—but if you have different deploy environments, you may not want all of the sent messages to POST data to the same webhook for each environment. Instead, you might want to have all email events from your staging environment only POST to a specific endpoint on your staging server.
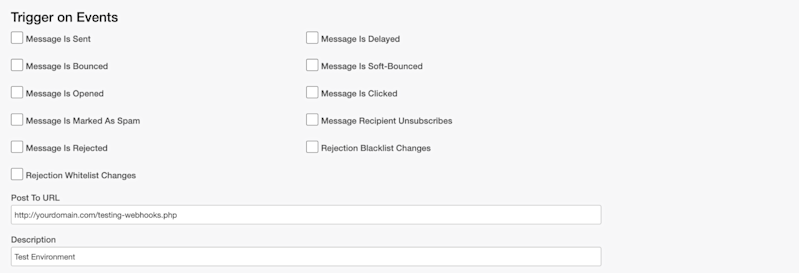
To set this up with the rules engine, first create a webhook with no trigger events:

Then, create a rule that looks for any emails sent from the API key being used for your staging environment and choose your test webhook URL:

You will need to create a new rule for each event you want to receive information about (sent, bounced, opened, etc.). You can also use sender, receiving domain, tags, or any other rule triggers to funnel events into a specific webhook.
Testing your rules
If you’re making adjustments to your emails—like setting up a new template or modifying Google Analytics tracking—you can use rules to test these changes. You can also use the Split Test feature to segment a small percentage of your sends as a trial, or you can use Test Mode so no live emails are sent.
When setting up your rule conditions, add random sample in addition to the other criteria for the rule. After the test generates data, you can use the Compare Stats feature to compare the results, modify the winning rule to match all the time, and delete the others.