Get the job done with a pro
From training to full-service marketing, our community of partners can help you make things happen.
Connect or Disconnect Canva
Dynamic visuals can capture your customers’ attention and increase engagement with your content. Create graphics for your brand with Canva and sync those designs to your Mailchimp files with our options to browse your Canva files directly. Then, use your designs across the marketing channels you've built in Mailchimp.
In this article, you'll learn how to connect, disconnect, and use the Canva integration.
Note
This article describes the Mailchimp for Canva integration that launched in November 2024. If you’ve been using Mailchimp for Canva before this, you’ll need to disconnect your existing integration and connect the new one. Once you’ve reconnected, you’ll see the updated syncing described in this article.
To watch this video, you need to accept Performance and Functionality Cookies.
For more info, check our cookie policy.
We're sorry. Due to a technical issue, the video is currently unable to load. Please try again later.
Before you start
Here are some things to know before you begin this process.
- To access the features of this integration, you’ll need a Canva account.
- If you use this integration with a free Canva account, you may be limited to certain design templates.
- The Canva integration is best used to create individual design elements for your Mailchimp campaigns. We don’t recommend you use a single Canva design as an email template. You won’t be able to add multiple links to a single Canva image, and your email may reformat or trigger spam filters.
How it works
First, you’ll connect your Mailchimp and Canva accounts. If you don’t have a Canva account, we can walk you through the process. Once you’ve connected your accounts, you can sync your Canva designs directly into Mailchimp. You’ll have the option to select the file type for the images you've chosen to sync. Choose between popular formats like PNG or JPG. Once imported, you can use the images with your emails, website, social posts, ads, and other Mailchimp features.
Note
Your files are imported as static images. Embedded HTML links aren’t imported.
Connect Canva
First up, you'll connect your accounts.
To connect your Canva account, follow these steps.
- On the Canva integration detail page in your Mailchimp account, click Connect.
- Review the connection steps in the pop-up window and click Continue.
- On the pop-up window, enter the email address associated with your Canva account and click Continue. If you don’t have a Canva account, enter your email address and we’ll help you create one.
- Review the data connection disclaimers and click Allow.
Nice! We’ll connect your Canva account to your Mailchimp account. Once the connection is complete, click View dashboard to see your account details and review our suggestions for what to do next.
Sync and use your Canva Designs
Once you’ve connected your Mailchimp and Canva accounts, the accounts will sync automatically. When the sync is complete, you can access your designs in the Content Studio.
To manually sync your designs and add them to an email, follow these steps.
- In the email builder, click an Image block, or click and drag an Image block into your layout from the side panel.
- Click Add image.
- Select the Canva tab.
- Click Refresh thumbnails to sync all of your Canva designs.
- To insert a single image, choose an image and click Sync and Insert.
- If your design contains multiple images, click View images. Then choose an image and click Sync and Insert.
Note
Designs larger than 10MB in size will sync as JPG images even if you've chosen to sync them as PNG files.
Manage Canva in Mailchimp
Once you've connected your Mailchimp and Canva accounts, you can view the integration details, manage settings, and take advantage of Mailchimp's features to grow your audience and connect more deeply with your customers.
To manage your Canva and Mailchimp integration from your Mailchimp account, follow these steps.
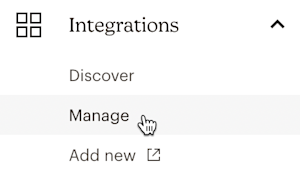
- Click Integrations, and then choose Manage.
- Click Canva.
- On the Manage Canva page, you'll find your integration stats and our recommended next steps for your account.
- Find our recommended next actions and click to learn more about what you can do with Mailchimp.
Next steps
After you connect the integration and import a design, add it to a Mailchimp email with an Image content block in the legacy builder or new builder. To embed a design as HTML for a website, check out this Canva article.
To learn more about Mailchimp’s design tools, check out these guides.
Use the Content Studio
Upload, Add, and Edit Images in Emails and Landing Pages
About Your Website in Mailchimp
Create a Social Post
Disconnect Canva
If you disconnect Canva from your Mailchimp account, your Canva designs remain in the content studio.
To disconnect Canva from your Mailchimp account, follow these steps.
- Click Integrations, then choose Manage.

- Click Canva.
- Click the Manage App drop-down, and then choose Disconnect site.
- In the pop-up window, enter DISCONNECT, then click Disconnect.
That’s it! You’ve successfully disconnected the Canva integration.
Technical Support

Have a question?
Paid users can log in to access email and chat support.