How the Form Builder Works
Learn how to customize forms, welcome emails, and other response emails with our Form Builder.

Get the job done with a pro
From training to full-service marketing, our community of partners can help you make things happen.
Use advanced mode to customize Mailchimp-hosted signup forms. You can send recipients to your brand of thank you pages and error messages. Add hidden fields to gather data to segment your audience.
In this article, we’ll show you how to switch to advanced mode, and tell you which forms you can edit. We'll show you how to redirect people to your thank you pages and error messages, and how to add hidden fields to your custom form.
Here are some things to know before you begin this process.
To access advanced mode, follow these steps.

Note
If you use advanced mode to custom code your forms, use the Audience Settings page to send a final welcome email, send an unsubscribe confirmation email, and let subscribers pick an email format.
You can customize most Mailchimp audience management forms, emails, and confirmation screens.
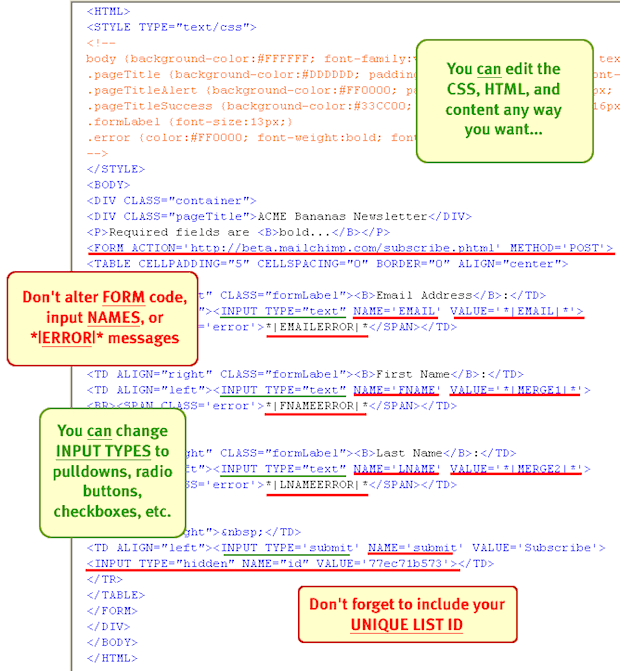
When you customize, make sure you don't alter the unique Form tags, field names, and merge tags, because they're connected to the audience and need to stay the same. The following image shows highlighted areas of what you can and shouldn't edit.
You can set up a meta redirect to send people to custom thank you pages on your website. For more information about thank you pages, check out Design and Host Your Own "Thank You" Pages.
Here's the meta redirect code you'll want to use. Make sure to replace http://www.yourwebsite.com/ with the URL you want to redirect to.
<meta http-equiv="refresh" content="0;URL=http://www.yourwebsite.com/"/>
Here's how to set up the meta redirect.
<head> section of the thank you page's code.If you prefer to handle signup form errors on your own instead of having Mailchimp manage them, use a meta redirect to pass signup form data back to your domain using this code.
<meta http-equiv="Refresh" content="0;url=http://www.domain.com/newsletter.phtml?EMAIL="*|EMAIL|*"&FNAME="*|FNAME|*"&LNAME="*|LNAME|*"">
The URL should be a full path to your newsletter subscriber page. To include the audience variables' names, navigate to your audience settings and view the fields and associated merge tags.
To complete this process, you'll need to know how to process GET variables in your site and make sure your audience ID is a part of any form you submit back to our domain.
Instead of using a meta redirect, you could also use our API. You'll still most likely want to add a meta redirect on the final confirmation screen to make the sign-up process feel totally seamless to your subscribers.
To add a hidden field to your advanced form code, follow these steps. For more information about adding hidden fields, check out Add Hidden Fields to a Signup Form.
<input type="hidden" name="FNAME" value="*|FNAME|*">
Technical Support

Have a question?
Paid users can log in to access email and chat support.
Learn how to customize forms, welcome emails, and other response emails with our Form Builder.
You can add up to 30 custom fields to your Mailchimp signup form. Learn how to change the look and feel of these fields with CSS.