
Get the job done with a pro
From training to full-service marketing, our community of partners can help you make things happen.
Send an Email to a Segment from Your QuickBooks Online Dashboard
Once you’ve connected your QuickBooks Online and Mailchimp accounts, you can use the data from your QuickBooks Online account, like purchase history or buying habits, to target your marketing to specific sets of your customers.
In this article, you’ll learn how to send an email to a suggested segment from your QuickBooks Online dashboard.
Before you start
Here are some things to know before you begin this process.
- You’ll need to have connected your QuickBooks Online and Mailchimp accounts to use segmentation. Check out Connect or Disconnect Mailchimp for QuickBooks Online for more information.
How it works
When you connect your QuickBooks Online and Mailchimp accounts, your QuickBooks Online customer information syncs to your Mailchimp account. Your customers transfer as contacts in your Mailchimp audience. The sync tags the contacts as having been imported from QuickBooks Online so that you can easily identify them for targeted marketing efforts.
You can use your QuickBooks Online dashboard to view your audience and contacts and create an audience segment based on criteria that you set. For example, you can create an audience segment that targets customers who’ve spent more than a certain amount with you. Then, you can create an email targeting those customers specifically.
For this example, we’ll use an audience segment of customers who have spent more than $200 at The Potted Planter. Then, we’ll create an email with a coupon and send it to this segment.
Create and send to an audience segment
To create and send to an audience segment from your QuickBooks Online dashboard, follow these steps.
- Click Audience, then choose Audience dashboard.
- If you have more than 1 audience, click the Current audience drop-down and choose the one you want to work with.
- Scroll to Quickbooks section. Next to Suggested Automations is a list of Suggested Segments, which contain pre-built segments based on e-commerce metrics in your Quickbooks account.

- If you want to change the criteria that define the segments, click Customize.
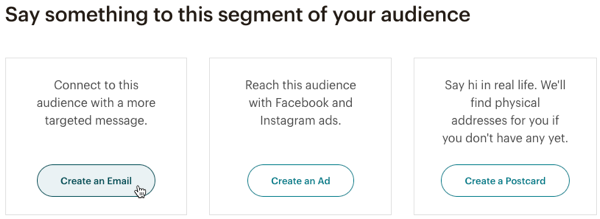
- Hover over the Top customers segment and click Target with Campaign.

- Click Create an Email.
- Customize your email with the following:
- Click Add from and review or update the sender name and email address. Click Save to continue.
- Click Add subject and enter the subject line text. You can also add preview text on this page. Click Save to continue.
- Click Design email to create the email content. To learn more about all the things you can do to align your brand and marketing goals, check out Design an Email with the New Builder. When you’re finished with your email design, click Save and exit.
- Click Add send time to setup your sending schedule for this email.
- If you want to send your email immediately, select Send now.
- Click Save, then click Send.
- On the Ready to send? pop-up modal, click Send now.
Note
If you have an Essentials plan or higher and want to schedule your email for a future date and time, check out Schedule or Pause a Regular Email.
Next steps
Now that you’ve sent your first email to a segment of your customers, learn more about audience segments, automation flows, and emails with the following articles and guides.
Technical Support

Have a question?
Paid users can log in to access email and chat support.