Get the job done with a pro
From training to full-service marketing, our community of partners can help you make things happen.
Manage Mailchimp for Shopify
Once you’ve connected Mailchimp for Shopify and completed your initial sync, you can adjust your settings, add SMS subscriber syncing, and create custom rules and attribution windows.
In this article, you’ll learn how to manage your Mailchimp for Shopify app.
Things to know
Here are some things to know about managing Mailchimp for Shopify:
- You’ll need to have connected Mailchimp for Shopify and completed your initial sync before you can access the functions described in this article. Learn more at Connect or Disconnect Mailchimp for Shopify.
- You must have manager access or higher in Mailchimp to make changes to the integration. To learn more about user levels, check out Manage User Levels in Your Account.
- To learn more about how customer and behavioral data is synced between Shopify and Mailchimp, check out About Mailchimp for Shopify Syncing.
Manage app settings in Mailchimp
To manage Mailchimp for Shopify app settings in Mailchimp, follow these steps.
- Click Integrations and choose Manage.
- Click Shopify.
- On the Manage Mailchimp for Shopify page, you’ll see the status of your synced customers, products, and orders.
- Scroll to view our suggested actions like adding pop-up forms and automated workflows.
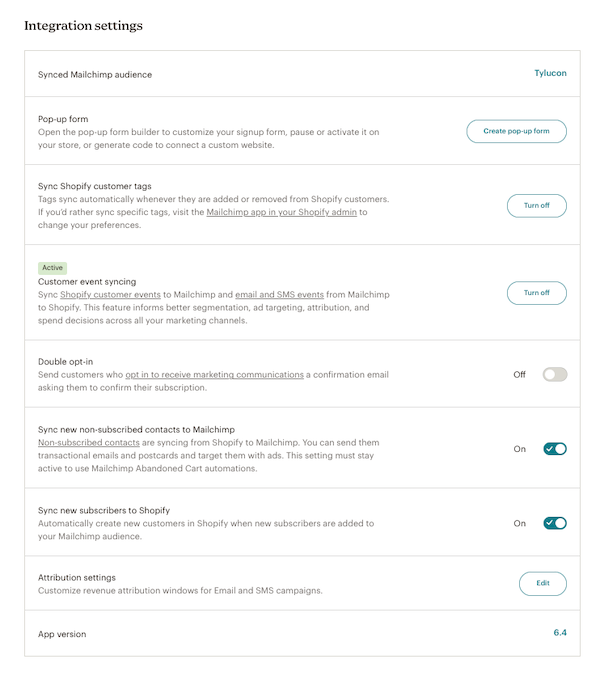
- Scroll to review your integration settings and app version.

- Click your synced audience to view specifics about it.
- Click Create pop-up form to access the Mailchimp form builder or click the form name to edit your existing form. Learn more about pop-up forms at Add a Pop-Up Signup Form to Your Website.
- Click to toggle syncing on or off Shopify customer tags, Shopify customer events, or new subscribed or non-subscribed contacts. Check out About Mailchimp for Shopify Syncing to learn more about how data is synced and Sync Shopify Customer Tags to Mailchimp for details on working with customer tags.
- Click Edit to customize attribution settings. Check out the following section to learn more.
Customize attribution settings
Once you’ve connected your Shopify store to your Mailchimp account, you’ll start to see attribution reports that measure how your emails and SMS messages affect your sales. Check out About Mailchimp Attribution to learn more.
To change the default attribution windows, follow these steps.
- On your Manage Mailchimp for Shopify page, scroll to view your app settings and click Edit next to Attribution settings.
- On the pop-up modal, click in the Email window or the SMS window fields and enter the appropriate numbers and units. When you’re finished, click Save.

Manage app settings in Shopify
Once you’ve connected Mailchimp for Shopify, access your app dashboard in Shopify to manage tagging and rules, manually trigger discount code syncing, manage app settings, and activate or deactivate SMS subscriber syncing.
To access the Mailchimp for Shopify app dashboard in Shopify, follow these steps.
- Click Integrations and choose Manage.
- Click Shopify.
- On the Manage Mailchimp for Shopify page, click Manage App and choose Shopify details.
- If necessary, log in to your Shopify store. You’ll see your app dashboard and sync stats.
- Click Audience Stats to review your overall audience status.
- Click discount Codes, and then click Resync to manually initiate a discount code sync in addition to the daily automatic sync.
- Click Tag Syncing to manage your tag sync settings. Check out Sync Shopify Customer Tags to Mailchimp to learn more.
- Click Rule Builder to create a new tagging rule or manage rules you’ve already set up. Sync Shopify Customer Tags to Mailchimp to learn more.
- Click Settings to review and manage app settings related to enabling double-opt in, syncing new customers and non-subscribed contacts, and managing customer event syncing. Check out About Mailchimp for Shopify Syncing to learn more.
- Click SMS Subscriber Syncing to review and manage syncing SMS subscribers between Mailchimp and Shopify. Check out the next section to learn more.
- If you've changed your store's theme or adjusted the theme's settings, be sure the Mailchimp for Shopify app embed is turned on. If the setting is gray, click the switch to turn it on.
Sync SMS subscribers to Mailchimp
Once you’ve connected your Mailchimp and Shopify accounts and completed the initial data sync, you can optionally choose to sync SMS subscribers. This is in addition to the standard e-mail subscribers; SMS subscribers will only sync if the contact already has an email address in your audience.
Note
You need an approved Mailchimp SMS Marketing program to sync subscribed SMS contacts from your Shopify store. Learn more about SMS Marketing.
To begin syncing SMS subscribers to Mailchimp, follow these steps.
- On your Shopify dashboard, click the SMS Subscriber Syncing tab.
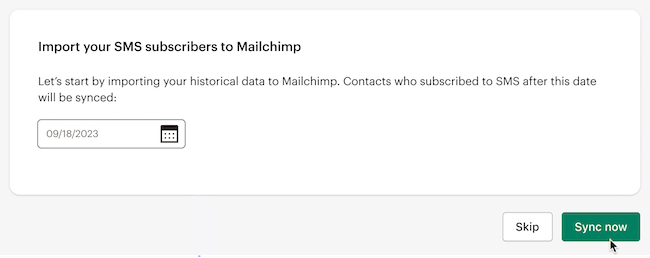
- Accept the default date for data-syncing or click in the date field to select a custom date, and then click Sync now. Take care in selecting the sync date; it's best practice to only send text messages to subscribers who have interacted with your business recently, or those you've already been messaging.

- On the pop-up modal, click Confirm.
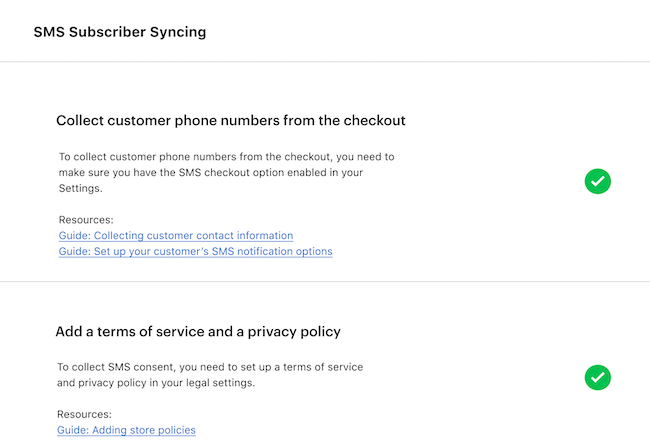
- Once your sync is complete, you may see options to update your Shopify checkout settings and store privacy policies. We recommend making these updates so your customers can subscribe to SMS marketing during their checkout experience.
- To enable SMS phone collection in your Shopify checkout, click Update checkout settings.

- To update the terms of service and privacy policies for your Shopify store, click Add store policies.

- To enable SMS phone collection in your Shopify checkout, click Update checkout settings.
That’s it! Once you’ve completed these additional tasks, you’ll see green checkmarks on your Shopify SMS Settings dashboard.

Technical Support

Have a question?
Paid users can log in to access email and chat support.