Create a Mailchimp Audience
Create your Mailchimp audience so you can import and collect new contacts for your emails.

Get the job done with a pro
From training to full-service marketing, our community of partners can help you make things happen.
Every Mailchimp audience comes with a flexible, customizable subscribe form that will help you grow your subscriber base. We call it your basic subscribe form, because we publish it on our servers.
Decide what information you want to capture, then customize the look of your form. Publish it, and share the link across your online channels.
In this article, you'll learn how to create a basic subscribe form.
Note
Your subscribe form has moved. Find it in Forms settings instead of the Other forms page. The Build it, Design it, and Translate it tabs have been replaced by a single form builder.
Here are some things to know before you begin this process.
We automatically generate a subscribe form for your Mailchimp audience. Find it in Forms settings, in the System forms table, along with the other forms and pages that serve your whole audience.
Your default form has a simple design, and you can use it right away. To make it your own, open the form builder. Your form appears on a canvas, your changes save as you work, and you can undo or redo anything.
The form builder covers your whole signup journey.
To access the form builder, follow these steps.
Now that you're in the form builder, you're ready to build, design, and publish your subscribe form.
The form builder features 3 navigation tabs to help you find your way around and accomplish certain tasks: Build it, Design it, and Translate it.
In the following sections, we'll show you how to use the tabs to edit your form, emails, and pages.
On the Build it tab of the form builder, you can add or remove form fields, customize text, and add a message to the top of your form.
In this example, you'll learn how to customize your greeting message, and add a new text field to your signup form to collect extra information from subscribers.
In the form builder, click the Build it tab.
Click the click to add a message field, and type your greeting message.
When you're done, click Save & Close.
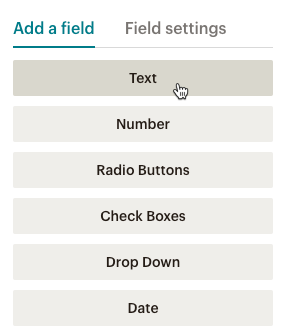
To add a new field, choose a field type from the Add a field menu.
Click Field settings to edit the Field label, Field tag, Field visibility, Help text, and Default merge tag value. You can also make the field required or optional with the Required field checkbox. Either an Email Address or SMS Phone Number input field is required.
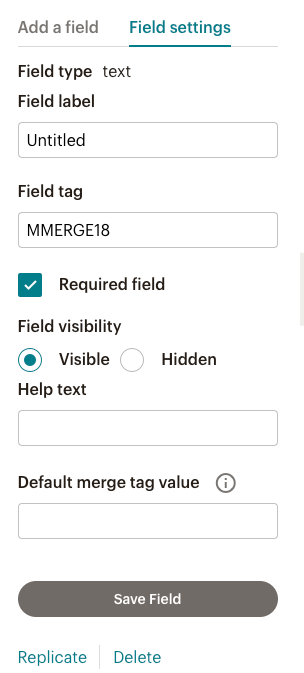
Other field settings are available to edit depending on the field type you choose.
Well done! Now you're ready to put your own spin on the form design.
On the Design it tab of the form builder, you can make your design more exciting with custom colors, fonts, or images.
In this example, you'll learn how to change the form's color scheme, and replace the header text with an image.
In the form builder, click the Design it tab.
Click Background.
Click the field to open the color picker, then select the hue and saturation you want for your form’s background. Your changes save automatically.

To add a band of contrasting color to your form, click Outer wrapper.
Click the field to open the color picker, then select the hue and saturation you want for your form’s outer wrapper.
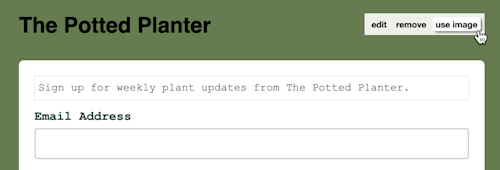
To insert a header image, hover over the header of your form, then click Use image.
Upload an image from the content studio, then click Insert.
Set image proportions, then click Save & Insert Image.
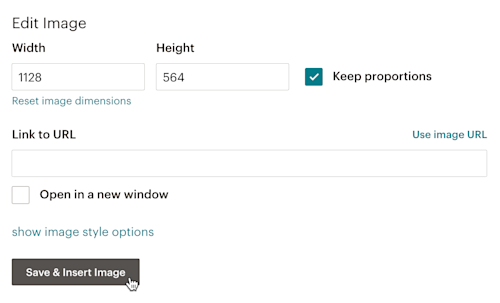
All set! You’ve designed your signup form. If you need to translate your form, move on to the Translate it tab.
On the Translate it tab of the form builder, you can set your default language, turn on auto-translate, customize default form text, or change text direction.
In this example, we'll show you how to change the default text of the Subscribe button on your signup form.
In the form builder, click the Translate it tab.
Click the Subscribe field, then type your custom or translated text.
Click Save Translation Settings.
Nice! Your signup form is customized. You’re ready to share your signup form and grow your audience.
Some parts of your forms and response emails are linked to audience information, so you can't edit them in the form builder. To edit your audience name, go to your audience defaults. To update the website, physical address, or permission reminder for your audience, update Required Footer Content in your audience settings.
Other pages are connected to your audience too.
*|UPDATE_PROFILE|* merge tag. If you publish a preferences center for your audience, it replaces the update profile form.
Your signup form is built, designed, and translated. Now what? Here are some ways to enhance your signup experience.
Monitor form success with subscribe notifications.
Use merge tags in your signup response emails to greet your new subscribers by name.
Try different types of signup forms.
Advanced developers can use our powerful Mailchimp Developer API to build a signup form from scratch.
Technical Support

Have a question?
Paid users can log in to access email and chat support.
Create your Mailchimp audience so you can import and collect new contacts for your emails.
To help you build a better audience, Mailchimp confirms that subscribers signed up to receive your emails. Learn the benefits of the opt-in process and how it works.